Once again, my studio lights and backgrounds were packed into the car to be set up at a location I hadn't previously seen. The brief was to photograph as many different garments on as many different people as possible in as short a time as possible and the photographs were to be used by an online shop. All of the garments were blank and within the website structure, various graphics and designs will be overlaid to give maximum versatility of combinations of garment, colour and design. This also allows for new designs to be added into the range without additional photography. To help make the designs sit on the garments in a believable way, the lighting was kept fairly flat and even and the upper parts of all garments were made as wrinkle free as possible.
The location for the photography was a back room within a small industrial unit and it had an upstairs mezzanine storage area which allowed for a good viewpoint for this one minute time lapse sequence.
Cycling
The Halfords Tour of Britain made its second visit to Chester city centre last week for round nine and I went along for a chance to play and practice at photographing sport and action. I watched the race last year but there was a torrential downpour about 10 minutes before the start and a big dark cloud made the whole city centre photographically very dark. This year was a fine summer evening and having more idea about what to expect I was able to plan some possible shooting angles in advance.

As with last year, a large number of both professional and serious amateur photographers were positioned on the outside of the tight turn at The Cross for the circuit to head up Northgate street towards the start & finish line. This was also the position for one of the TV cameras who tend to always get the best spots but this year I wanted to do something different.
The photos from the outside of the turn allowed for using a long lens looking towards the Eastgate Clock and again, most photographers in that area had lenses of the 200mm plus length. I arrived about one hour before the race was due to start and positioned myself on the inside of the corner with a wide angle 14mm lens. No other photographers joined me on my side of the circuit which meant I was bound to be getting something different to everyone else.

I used the warm up laps for the riders to get my panning technique warmed up and set everything on the camera to manual - focus set manually to about 1 meter in front, exposure set to manual and a small amount of fill in flash set to manual. When the race was underway, the riders would pass me so quickly that I soon realised that to actually be looking through the viewfinder while pressing the shutter was pointless and I was able to pan with the action much more accurately by just aiming in the approximate direction of one of the riders and panning with them as quickly as possible.

For something different, I then held the camera on the floor looking under the crash barrier and again panned in the cyclist's general direction as they passed. In order to convey the speed of the event and also how close the cyclists are to the crowds on the corner, I then held the camera over my head as high as possible and as still as possible and let the action blur slightly as it passed beneath me.

For all four of these photographs I wasn't looking through the viewfinder while any of them were being taken, I'd just pre-visualised the type of photograph I was after and let the camera do it's job. In all four photographs the sense of speed, movement and proximity is achieved by being at a vantage point that no other photographer seemed to want to be.
Clothesline
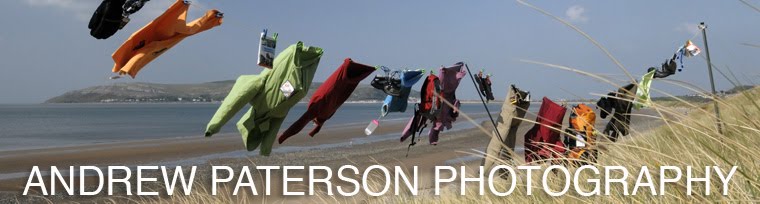
The image I'm currently using as the header for the blog is one that often gets questions and comments. The idea is actually very simple and straightforward and the production of the photograph was equally as simple. A shop that specialises in outdoor clothing, hiking gear and camping equipment was launching a new website and the photograph depicts that they are 'now online'.

The pre-production planning was fairly minimal and comprised a vague idea of an area of the North Wales coastline that would be a suitable location. Then a tide calendar was consulted and weather forecasts were studied until we came to a suitable day that would be sunny with blue sky and a tide that would give us plenty of beach to play on.

A car was loaded up with a clothes line, a spare clothes line, a couple of boxes of props to hang on the line plus other bits and pieces we thought might be needed, things like guy ropes to anchor the upright posts and a sledge hammer to bed them well into the ground. Fortunately, the North Wales coast road has plenty of side roads and junctions which allowed us to easily and quickly look at several possible locations until we found one that offered easy access from car to beach and was suitably positioned to give a very big open sky and landscape as a background.

After unloading the car and carrying everything to the sand dunes it was then a fairly straightforward job of setting up the vertical metal posts and anchoring them to a fence at one end and tied to some lumps of driftwood at the other. What we hadn't anticipated was that once the props were pegged onto the line, the weight made the line sag so low that it was touching the sand in the middle but we had brought with us a lighter set of clothes line poles as spares and one was used in the middle of the line to help hold everything up. What can't be seen in the final photo is that the coastal sea breeze was too strong against the coats and jackets which were acting like sails and the middle pole soon started to bend under the weight. In the final image, the client is actually lying as low as possible in the dunes holding the pole steady at arms length while I was photographing enough frames to know that there would be a good overall compositional balance of the items blowing in the wind.

The one last thing that isn't shown in the final image is that all the while we had the clothes line set up, we were getting some very strange looks from the people walking along the beach. They could be seen looking at each other and then looking towards us and we just knew exactly the sort of conversation they were having!
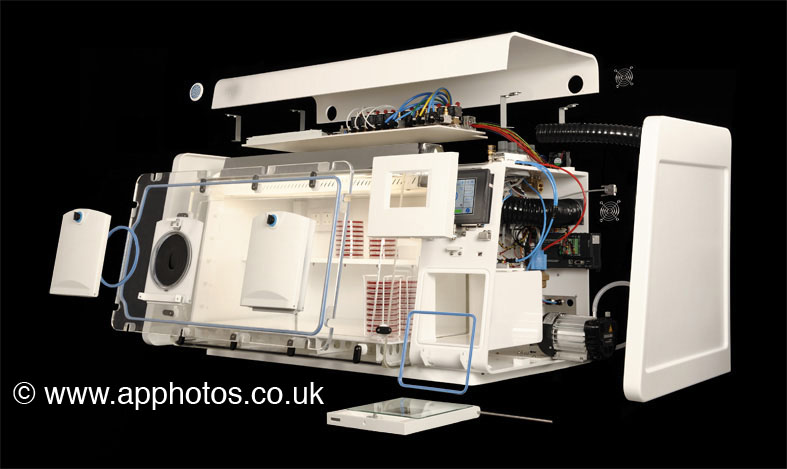
Exploded
It's often the case that a company with something new to promote often explains how all of the product benefits are hidden inside a beige box. The challenge is to show that it really is a new and exciting product that will be a good investment for the purchaser and that there's more to it than just a new external shell.
As a means of showing a whole range of features and technical details of a new piece of laboratory equipment, discussions were made about the possibility of showing an exploded view of the product. The idea was to show the quality and design that goes into the individual components that make up the product but at the same time we could easily control how much 'secret' detail was revealed by careful positioning and overlapping of other components.

Typically, this sort of image is usually produced as a CAD illustration but it was decided that photographing for real would be more plausible. Several ways of producing the final image were discussed and the final photograph is a composite of several separate images however all of the major components were photographed as one shot. There was lots of string, fishing wire, a glue gun and pieces of tape, the challenge being waiting for items to stop gently swaying in the air currents caused by us walking around the studio.

Once the basic structure of the final image was photographed, we then started thinking in 3D to work out how certain elements would look if they were 'floated' away from the carcass and what would be revealed beneath. To keep perspective, all of the component elements were photographed from the same camera position and again various methods of hanging and holding were employed. Keeping the same camera position also meant that the lighting was consistent throughout and as a decision was made early on to use a black background, the post production work would be kept relatively simple.

Although the final image has over 20 elements that seem to be free floating, the photoshop file only required about 10 layers as many of the main elements were all contained in the base exposure. The final image was first used at an exhibition trade show as part of a product launch and it is continuing to be used in promotional material.
As a means of showing a whole range of features and technical details of a new piece of laboratory equipment, discussions were made about the possibility of showing an exploded view of the product. The idea was to show the quality and design that goes into the individual components that make up the product but at the same time we could easily control how much 'secret' detail was revealed by careful positioning and overlapping of other components.

Typically, this sort of image is usually produced as a CAD illustration but it was decided that photographing for real would be more plausible. Several ways of producing the final image were discussed and the final photograph is a composite of several separate images however all of the major components were photographed as one shot. There was lots of string, fishing wire, a glue gun and pieces of tape, the challenge being waiting for items to stop gently swaying in the air currents caused by us walking around the studio.

Once the basic structure of the final image was photographed, we then started thinking in 3D to work out how certain elements would look if they were 'floated' away from the carcass and what would be revealed beneath. To keep perspective, all of the component elements were photographed from the same camera position and again various methods of hanging and holding were employed. Keeping the same camera position also meant that the lighting was consistent throughout and as a decision was made early on to use a black background, the post production work would be kept relatively simple.
Although the final image has over 20 elements that seem to be free floating, the photoshop file only required about 10 layers as many of the main elements were all contained in the base exposure. The final image was first used at an exhibition trade show as part of a product launch and it is continuing to be used in promotional material.
Underwater
Engineering companies are always good places to photograph. There's always lots of 'stuff' that makes a photographer's job easy, big machines, big cranes, big lumps of metal. When I was contacted by a company who wanted to show their facility for pressure testing industrial valves, I knew there would be scope for something creative.
The valve was from a North Sea oil rig and the test was to simulate the working conditions where the valves are installed to evaluate the procedures of maintenance but in a controlled environment. It was explained that the testing would take place underwater in a tank full of water at 4 degrees and there would be workmen in the water with the valve.
As I would be photographing during a live test, the clients initial expectation was for me to remain around the perimeter and photograph the activity as an observer, but as soon as he had mentioned a water tank, I had other ideas. My mind was already wondering if my camera would fit inside a small fish tank and how I could ensure it didn't sink with my camera inside and how would the test look with the water half way up the lens.
The client was saying things about how he wasn't paying for a new camera if it got wet but I was already thinking about blocks of polystyrene as ballast and methods of firing the camera while I was holding a fish tank in a much larger tank of cold water.
.jpg)
The final solution was quite straightforward. A proper waterproof housing would have been prohibitively expensive for this exercise but with only a few tests in the kitchen sink, I was ready to go. The camera fitted nicely into the fish tank and I placed a towel underneath just in case there were any splashes. A cable release was taped to the lid of the tank so I could fire the camera with a thumb and at the same time be holding the tank steady with both hands. I added a small spirit level as I wouldn't be looking through the camera while photographing and remote lights were triggered via a PocketWizard which was also placed in the fish tank.
.jpg)
As with photographing any live event, there were a lot of photographs that didn't work but there were two that stood out above all of the others. A nice horizon line of water, a good dynamic stance of the workers and enough of the underwater valve was visible to explain the situation. The photographs are currently being used by the company as promotion of their testing facilities.
.jpg)
On Location
For many jobs that involve photographing a large range of large products, it's usually easier for me to pack up all of my studio equipment and travel to where the products are. There are many advantages to this: I know that I'll have brought everything I could possibly need to complete the job, can you guarantee that you'll have brought every single piece of stock? What if something is marked or damaged, have you brought spares? What if ideas change during the shoot, have you brought everything for plan B?
With me always travelling to the job, an inevitable consequence is that I often find myself setting up in unusual places. It's easy if I'm visiting a factory or warehouse, plenty of room to use there. Othertimes I'm often shown a meeting room that's full of furniture and the only solution is to take everything out and leave a corridor full of chairs while I work. Sometimes the space I work in might not at first be obviously suitable to set up a mobile photographic studio and the video below is one of those instances.
The first option I was given was the reception area. A low ceiling, pedestrian traffic, a staircase and too much furniture made it not an ideal choice. A quick walk through the warehouse revealed a space inbetween the fork lift truck and the American sedan that would be ideal. As much ceiling height as I could ever want, the ability to shoot from as far back as I needed and I wasn't going to be in the way of the day to day operation of the company.
The company supplies stainless steel catering sinks. Plenty of reflections to deal with and two people required to move them onto and off the set. The final photographs are cut-outs but all of the clean reflections were produced in camera. They are currently being used on the company website and in product specification leaflets.
Unusual
Over the years I've photographed a very wide and diverse range of things and places and a question that I'm often asked is "what's the most unusual thing you've photographed?" My answer always starts by saying that within the context of the job, nothing is unusual. If a company manufactures Wear-Once Disposable Paper Knickers (yes, really), then producing product shots is not unusual as that is what the company does. Other occasions where the items may at first seem unusual are a ceramic bladed kitchen knife, an art installation made entirely from carrots and the exterior of the house in Chester where Keith 'Orville' Harris grew up.
In all cases, the photographs were produced for a specific client requirement but there have been occasions when the photography could be classed as being of something unusual and this is one example.

The brief was to illustrate a play on words between E-coli and Cauli and the idea was to produce a photograph of a whole cauliflower in a way that would make it look sinister. The black background and dark shadowy lighting has become a style used throughout a series of images and each is photographed in a similar way. There are no fancy expensive lighting rigs, no delicately balanced pieces of mirror and no lights flagged with patterned gobos.
The lighting consists of a Maglite torch with a tightly focussed spot beam, a long exposure and the camera on a tripod. The final image consists of 5 or 6 different files, all perfectly in register, with each containing a section of cauliflower 'painted' with the torch during a 6 second exposure. The files are simply blended together in Photoshop to create an image with overall balanced lighting.
The technique is very simple and straightforward although it takes many attempts to get a feel for how the light works on various areas of the subject. It works best on items that have a delicate surface texture to enable deep shadows to reveal the shapes.

As is often the case, it's the simple ideas that are most successful and I now regularly pack a torch as part of my studio lighting kit. The photo of the hippo skull was produced in exactly the same way.
Subscribe to:
Posts (Atom)